Monday, October 28, 2019

Dependency Injection C# Example| Brief Introduction To Dependency Injection | Constructor Dependency Injection

Hello & As-salam u alikum ! , In this article we will learn about the most important and the confusing topic for the new developers and the topic is " Dependency Injection In C# "

What is Dependency Injection ? 

 It is a software design pattern that allows us to develop such application code which contain loosely coupled code.As a developer we only focus on developing features that result the correct desired output, but many of us do not think about future. If we need to make changes in future  in our application code, our application can get crashed if we did not follow any design pattern at the time of developing  application code . see the below example to understand with a humor.

The above picture represents your application when you didn't follow any design pattern while developing application . any small change can crash or destroyed your product so we need to follow design patterns to make our code loosely coupled.

Dependency Injection is one of the concept in design pattern which can  reduce the hard coded dependencies among your classes by injecting the dependencies at run time.

Types Of Dependency Injection :

  1. Constructor Injection
  2. Property Injection
  3. Method  Injection

In this article we will discuss the 1st type only, later we will discuss the remaining two.

Constructor Injection :

This is the most commonly used type of DI in Object Oriented Programming. It has normally one parametrized Constructor by removing the default constructor. In Constructor Injection we are forced to provide an specified value  in constructor at the time of object creation.

Code Implementation: 

For Implementing the Constructor injection 1st we need to make an interface ,which will contain  base methods which we implement in the implemented classes , In my case I have only one method print()
In the next step I have made a class to implement the interface . IText interface is implemented in model1 class. 

 similarly, I ll develop another class which will implement the same method with different output.
Now I need to make a class for constructor Injection and see the below code.

In the above code , I have make a class in which constructor I am providing Interface as parameter and in method base method is implemented.

from the above code ,every one will understand that at the time of object creation we just need to change the class for different implementation. model1 and model2 is implementing the IText Interface and both classes has different implementation of method "Print()" ,In future if we will ask to change the implementation ,so we will just change the class references by changing all code. that's easy and all for today. 


I hope you like this article, If really understood then please share this article for supporting my blog. and subscribe to my youtube channel. 
  

Tuesday, October 22, 2019

2-Add New Records in SQL-Server Table in React Js by using Default Template (Part-2)

Hello & As-salam u alikum ! , In this article we will learn to add new records in React js with asp.net core. 

Step# 1:  

https://dotnetcorecommunity.blogspot.com/2019/10/1-display-data-from-sql-server-table-in.html
         Watch Previous Part to fetch data from  controller to React js Component and display on View.


Step# 2:

Go to the controller ,In our case our controller name is EmployeeController which we had made in last article, so add a new action method in the controller ,below is the code for adding new record method. 


[HttpPost]

        public void Create(TblEmployee obj)

        {

            TblEmployee employee = new TblEmployee(); 


                employee.Department = obj.Department;

                employee.City = obj.City;

                employee.Gender = "Female";

                db.TblEmployee.Add(employee);

                db.SaveChanges();

}


the Above code represents an action result which will called from react component to add data.

Step# 3:

We do not want our user to move to a new page for adding new records , we will provide user a component on the top of the grid , so that he/she can add new records on the same page on which data is displayed.


now create a new file named as Create.js in component folder. 


Paste the following code in Create.js folder .
import React, { Component } from 'react';
 class Create extends Component {

        this.state =
            {
            Name: "a", City: "a", Department: "a", id: 0,
    }


    {


     {


        this.setState({ [e.target.name]: e.target.value }); //what ever you write ,it changes the state


    }


     {


        var obj = { EmployeeId: this.state.id, Name: this.state.Name, Department: this.state.Department, City: this.state.City };


        $.ajax({


            url: '/Employee/Create',

            data: obj,

            success: function (response)

            {


            },

            error: function (response)

            {


    // This will handle the submit form event.  


            return (<span> </span>);

        }

        else {


                    <div className="card-body">


                            <form >

                                <div className="form-group">

                                    <label>Name:</label>

                                    <input type="text" onChange={this.textchange.bind(this)} className="form-control" id="Name" name="Name" />

                                </div>


                                    <label>City:</label>

                                    <input type="text" onChange={this.textchange.bind(this)}  className="form-control" id="City" name="City" />

                                </div>


                                    <label >Department:</label>

                                    <input type="text" onChange={this.textchange.bind(this)} className="form-control" id="Department" name="Department" />

                                </div>


                                    e.stopPropagation();

                                    e.preventDefault();

                                    this.AddRecord();

                                    this.props.parentcall(false);


                            </form>

                        </div>


                </div>


        }

    }


Step# 4:

We need to make some changes in our old code that we had done in fetchData.js


import React, { Component } from 'react';

import Create from "./Create";


const $ = window.$;

export class FetchData extends Component

{


 constructor(props)

 { 


    super(props);

     this.state =

         {

         forecasts: [], loading: true,

         Name: "a", City: "a", Department: "a", id: 0,

         createisvisible: false,

         createbuttontext: "Create New Post",

         skip: 0,

         take: 1,

         totalPost: 0,

         x: false


     };

     this.callbackFunction = this.callbackFunction.bind(this)

   //  this.UpdateTime();

  }


    callbackFunction = (data) => {

        this.setState({ createisvisible: data, createbuttontext: "Create New Post", x: true });


    };


     componentDidMount()

     {

         console.log("DID MOUNT CALLED");

         fetch('Employee/GetAllEmployees')

             .then(response => response.json())

             .then(data => {

                 this.setState({ forecasts: data, loading: false });

                 console.log(this.state.forecasts);

             });


    }


    componentWillUpdate() {


        fetch('Employee/GetAllEmployees')

            .then(response => response.json())

            .then(data => {

                this.setState({ forecasts: data, loading: false });

                console.log(this.state.forecasts);

            });


    }


    UpdateTime() {

        setInterval(() => {


            fetch('Employee/GetAllEmployees')

                .then(response => response.json())

                .then(data => {

                    this.setState({ forecasts: data, loading: false });

                    console.log(this.state.forecasts);

                });

            console.log("Refersh");


        }, 10000);

    }


    //textbox change event -----------------------


    textchange(e) {

        this.setState({ [e.target.name]: e.target.value }); //what ever you write ,it changes the state


        console.log(e.target.value);

    }


    render() {


        if (this.state.loading) {

            return <div>

                <img alt="Not Found" className="img img-responsive" src="Loader.gif" style={{ display: "block", marginLeft: "auto", marginRight: "auto" }} />


            </div>;


        }


        if (!this.state.forecasts.length) {

            return <div>No Records Found</div>;

        }


    return (

      <div>


            <div style={{ padding:"20px" }}> 

            <button className="btn btn-sm btn-info" onClick={e => {


                    let v = this.state.createisvisible;

                    if (v === false)

                    {

                        this.setState({ createisvisible: !v, createbuttontext: "Discard Post" });


                    }

                    else {

                        this.setState({ createisvisible: !v, createbuttontext: "Create New Post" });


                    }


                }}>

                    {this.state.createbuttontext}

            </button>

            </div>

            <Create parentcall={this.callbackFunction} isvisible={this.state.createisvisible} />


            <table className='table table-striped'>

                <thead>

                    <tr>

                        <th>id</th>

                        <th>Name</th>

                        <th>City</th>

                        <th>Department</th>

                        <th>Edit</th>

                        <th>Delete</th>


                    </tr>

                </thead>

                <tbody>

                    {this.state.forecasts.map(forecast =>

                        <tr key={forecast.employeeId}>

                            <td>{forecast.employeeId}</td>

                            <td>{forecast.name}</td>

                            <td>{forecast.city}</td>

                            <td>{forecast.department}</td>

                            <td>


                                <button type="button" onClick={e =>

                                {

                                    this.setState({ Name: forecast.name, id: forecast.employeeId, name: forecast.name, City: forecast.city, Department: forecast.department });


                                }} className="btn btn-primary" data-toggle="modal" data-target="#myModal">

                                    Edit

                          </button>


                            </td>

                             <td>

                                <button type="button"  className="btn btn-danger">

                                    Delete

                          </button>


                             </td>


                        </tr>

                    )}

                </tbody>

            </table>


      </div>

    );

    }


}


Conclusion: 


We are done with this module , now we will do edit and delete record in next article,Thank you for reading. Have a nice day.

Friday, October 18, 2019

How Asp.net Core Application Starts as a Console Application and Converts to a Web Application | Main Method in Asp.net Core | Part-3

 Hello and As-Salaam U Alikum! , In this article we will learn about the main method in Asp.net Core.


In the Previous articles we have created so many asp.net core projects but I didn't emphasis on a file which name is "Program.cs" . Yes we are going to discuss it now. 


whether you open any type of project e.g. (mvc,empty,web api etc) ,you will surely find this file in your solution explorer. just double click it , you will find two static methods in that file .


  1. Main()
  2. CreateWebHostBuilder()
As we can see CreateWebHostBuilder is called in Main method.First we will  discuss role of main method. As we know that a console application always has a main method from where the execution of program code begins. similarly, Asp.net core application also begin as a console application . The role of main method is to configure the application and starts it as web application . I know this is strange to all .net developers but keep patience , we will understand it in later articles that why it works like it.

As we can clearly see that there is a method CreateWebHostBuilder() main method. This method returns an object that implements the IWebHostBuilder  interface.

object of IWebHostBuilder  initially calls build() method which build a web host and host our asp.net core web application on that web host.

secondary it calls the Run() method which starts the application for listening incoming http requests.


what CreateDefaultBuilder does ?


  1. Establishing Web Server 
  2. Application & host Configuration from different configuration sources.
  3. Configuring Logging
OK, now lets discuss hosting point of view. Asp.net Core hosting can be done in two ways .

  1. In Process
  2. Out Process


While establishing a webhost "Startup.cs" class also configured using extension method of IWebHostBuilder   .


n the startup.cs file we have two methods.

  1. ConfigureServices()
  2. Configure()

The ConfigureServices() method of the startup class configures the services that are required by the application. The Configure() method of the startup class sets the application's pipeline of request processing. In a later article, we will discuss both of these methods in detail.

Wednesday, October 16, 2019

How Asp.net core is Different From ASP.NET | asp.net core 2.0 project structure | part-2

Hello & As-salam u alikum ! , In this article we will learn about Folder ,File  or Project Structure in asp.net core

If you have ever worked on older versions of ASP.NET  or .net framework using C# ,then you might be surely know that the project file extension is ".csproj" ,Similarly if you used to code in VB. net , then your project file extension was used to be ".vbproj" , But in asp.net core these concepts has been changed .


File and Folder References:
The ASP.NET Core Project File does not contain any references for folder or file. In previous versions of ASP.NET Framework, when we add a folder or a file to the project using Solution Explorer, then a reference to that folder or file is added in the project file. But with ASP.NET Core, the Project File does not include any reference for the Files or Folders added the project using Solution Explorer  

ASP.net Core Project File:

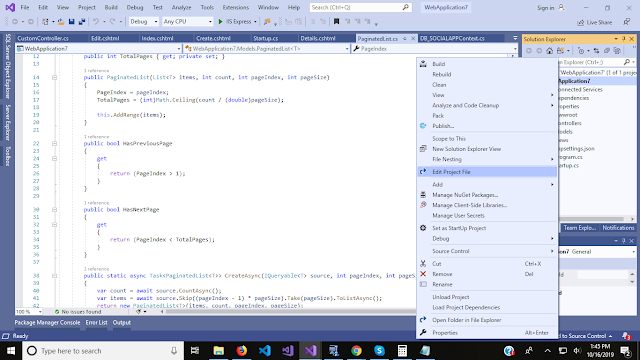
Right Click on the Project and Select Edit Project File.


TargetFramework: 
The TargetFramework element in the project file is used to specify the target framework for your application. To specify the target framework in the project file we are using something called Target Framework Moniker (TFM).
In our example, the application targets the framework netcoreapp2.2. The netcoreapp2.2 is the Moniker for .NET Core 2.2. If you remember, while we are creating this project, we select .NET Core 2.2 as the target framework.


AspNetCoreHostingModel: 
The AspNetCoreHostingModel element of the project file is used to specify how we are going to host the asp.net core application. Values for this AspNetCoreHostingModel element are either InProcess or OutOfProcess.
The value InProcess specifies that we are going to use the in-process hosting model for our application. It means we are going to host the ASP.NET Core Application inside of the IIS Worker Process which is nothing but w3wp.exe.

The value OutOfProcess specifies that we are going to use the out-of-process hosting model. In a later article, we will discuss the In Process and Out Of Process hosting model in detail.


Microsoft.AspNetCore.App: 
Microsoft.AspNetCore.App NuGet package is generally called the Meta Package. The Meta Package has not any content of its own but it contains a list of dependencies i.e. it contains other packages.
You can find this Meta Package, in the Solution Explorer, under NuGet which is present inside the Dependencies. When you expand the Meta Package, then you will find all the dependencies

Thank you for reading ,Have a good day ! In the next article we will Learn about Main method in asp.net core and In process Hosting & out process hosting

Read more »

Tuesday, October 15, 2019

How to Edit and Dispaly Records in Sql Server Table in asp.net core MVC C# (db First Approach EF-CORE) (Part-8)

Hello & As-salam u alikum ! , In this article we will learn to edit or modify records and display a single record on new page using query string.
Note : For Beginner Guide Articles :

https://dotnetcorecommunity.blogspot.com/p/aspnet-core-tutorials-paracticals.html


Step# 1:  
Watch previous article for creating a new record and upload Image  in asp.net core 

Step# 2:  
Add a new method "Details" in Custom Controller  and paste the following action method code.


[HttpGet]


        public async Task<IActionResult> Details(int? id)


        {

            if (id == null)

            {

                return NotFound();

            }


            TblUser u = await db.TblUser.Where(x => x.UId == id).FirstOrDefaultAsync();


            if (u == null)

            {

                return NotFound();

            }


            return View(u);

        }

Step# 3:
Now Right click on Detail action method and add view.

 Paste the below html code in that view page.

@model WebApplication7.Models.TblUser


@{


    ViewData["Title"] = "Details";


}


<h1>Details</h1>


<div>


    <hr />

    <dl class="row" style="border:1px solid black;box-shadow:20px 20px 50px 20px;padding:35px">

        <dt class = "col-sm-2">

            @Html.DisplayNameFor(model => model.UEmail)

        </dt>

        <dd class = "col-sm-10">

            @Html.DisplayFor(model => model.UEmail)

        </dd>

        <dt class = "col-sm-2">

            @Html.DisplayNameFor(model => model.UPassword)

        </dt>

        <dd class = "col-sm-10">

            @Html.DisplayFor(model => model.UPassword)

        </dd>

        <dt class = "col-sm-2">

            @Html.DisplayNameFor(model => model.UUserName)

        </dt>

        <dd class = "col-sm-10">

            @Html.DisplayFor(model => model.UUserName)

        </dd>

        <dt class = "col-sm-2">

            @Html.DisplayNameFor(model => model.UProfilePicture)

        </dt>

        <dd class = "col-sm-10">


            <img src="~/img/@Model.UProfilePicture" style="height:100px;width:100px"/>

        </dd>

        <dt class = "col-sm-2">

            @Html.DisplayNameFor(model => model.UAddedDate)

        </dt>

        <dd class = "col-sm-10">

            @Html.DisplayFor(model => model.UAddedDate)

        </dd>

        <dt class = "col-sm-2">

            @Html.DisplayNameFor(model => model.UModifiedDate)

        </dt>

        <dd class = "col-sm-10">

            @Html.DisplayFor(model => model.UModifiedDate)

        </dd>

        <dt class = "col-sm-2">

            @Html.DisplayNameFor(model => model.UIsuserlogin)

        </dt>

        <dd class = "col-sm-10">

            @Html.DisplayFor(model => model.UIsuserlogin)

        </dd>

        <dt class = "col-sm-2">

            @Html.DisplayNameFor(model => model.UIsuseraproved)

        </dt>

        <dd class = "col-sm-10">

            @Html.DisplayFor(model => model.UIsuseraproved)

        </dd>

    </dl>

</div>

<div>

    <a asp-action="Edit" asp-route-id="@Model.UId">Edit</a>

    |

    <a asp-action="Index">Back to List</a>

</div>


Step# :4 

Add two new method "Edit" in Custom Controller ,1st for Get Request and Second for Post request   and paste the following action method code.

[HttpGet]

        public async Task<IActionResult> Edit(int? id)

        {

            if (id == null)

            {

                return NotFound();

            }


            TblUser u = await db.TblUser.Where(x => x.UId == id).FirstOrDefaultAsync();


            if (u == null)

            {

                return NotFound();

            }


            return View(u);

        }


        [HttpPost]

        public async Task<IActionResult> Edit(int? id,TblUser ui, IFormFile file)

        {

            if (id == null)

            {

                return NotFound();

            }


            TblUser u = await db.TblUser.Where(x => x.UId == id).FirstOrDefaultAsync();


            if (u == null)

            {

                return NotFound();

            }


            if (file != null || file.Length != 0)

            {


                string filename = System.Guid.NewGuid().ToString() + ".jpg";

                var path = Path.Combine(

                            Directory.GetCurrentDirectory(), "wwwroot", "img", filename);


                using (var stream = new FileStream(path, FileMode.Create))

                {

                    await file.CopyToAsync(stream);

                }


                u.UProfilePicture = filename;


            }


                u.UUserName = ui.UUserName;

                u.UPassword = ui.UPassword;

                u.UAddedDate = DateTime.Now;

                u.UIsuseraproved = ui.UIsuseraproved;

                u.UIsuserlogin = ui.UIsuserlogin;

                u.UEmail = ui.UEmail;


                await db.SaveChangesAsync();

                return RedirectToAction("Index");


        }

Step# :5
Now Right click on Edit action method and add view and paste the below Html


@model WebApplication7.Models.TblUser


@{

    ViewData["Title"] = "Edit";

}


<h1>Edit</h1>


<hr />

<div class="row">

    <div class="col-md-4">

        <form asp-action="Edit" enctype="multipart/form-data">

            <div asp-validation-summary="ModelOnly" class="text-danger"></div>

            <input type="hidden" asp-for="UId" />

            <div class="form-group">

                <label asp-for="UEmail" class="control-label"></label>

                <input asp-for="UEmail" class="form-control" />

                <span asp-validation-for="UEmail" class="text-danger"></span>

            </div>

            <div class="form-group">

                <label asp-for="UPassword" class="control-label"></label>

                <input asp-for="UPassword" class="form-control" />

                <span asp-validation-for="UPassword" class="text-danger"></span>

            </div>

            <div class="form-group">

                <label asp-for="UUserName" class="control-label"></label>

                <input asp-for="UUserName" class="form-control" />

                <span asp-validation-for="UUserName" class="text-danger"></span>

            </div>

            <div class="form-group">


                <img src="~/img/@Model.UProfilePicture" style="height:200px;width:200px" />

                <input type="file" name="file" />

                <span asp-validation-for="UProfilePicture" class="text-danger"></span>

            </div>

            <div class="form-group">

                <label asp-for="UAddedDate" class="control-label"></label>

                <input asp-for="UAddedDate" class="form-control" />

                <span asp-validation-for="UAddedDate" class="text-danger"></span>

            </div>

            <div class="form-group">

                <label asp-for="UModifiedDate" class="control-label"></label>

                <input asp-for="UModifiedDate" class="form-control" />

                <span asp-validation-for="UModifiedDate" class="text-danger"></span>

            </div>

            <div class="form-group">

                <label asp-for="UIsuserlogin" class="control-label"></label>

                <input asp-for="UIsuserlogin" class="form-control" />

                <span asp-validation-for="UIsuserlogin" class="text-danger"></span>

            </div>

            <div class="form-group">

                <label asp-for="UIsuseraproved" class="control-label"></label>

                <input asp-for="UIsuseraproved" class="form-control" />

                <span asp-validation-for="UIsuseraproved" class="text-danger"></span>

            </div>

            <div class="form-group">

                <input type="submit" value="Save" class="btn btn-primary" />

            </div>

        </form>

    </div>

</div>


<div>

    <a asp-action="Index">Back to List</a>

</div>


Step# :5
 You need to make changes on Index.cshtml  to display Edit and Detail Button .

In the above image I have highlighted the  changes on Index.cshtml page, here is the code that you need to paste in place of old table.


<table class="table table-responsive">

                <thead>

                    <tr>

                        <th>ID</th>

                        <th>Image</th>

                        <th>

                            <a asp-action="Index" asp-route-sortOrder="@ViewData["NameSortParm"]"> <span class="glyphicon glyphicon-sort"> Name</span>  </a>


                        </th>

                        <th>Email</th>

                        <th>

                            <a asp-action="Index" asp-route-sortOrder="@ViewData["DateSortParm"]"> <span class="glyphicon glyphicon-sort"> Added Date</span>  </a>


                        </th>

                        <th>Is Login</th>

                        <th>Is Approved</th>

                        <th>Details</th>

                        <th>Edit</th>


                    </tr>

                </thead>


                <tbody>


                    @foreach (var item in Model)

                    {

                        <tr>

                            <td>@item.UId</td>

                            <td><img src="~/img/@item.UProfilePicture" style="height:70px;width:70px;" /></td>

                            <td>@item.UUserName</td>

                            <td>@item.UEmail</td>

                            <td>@item.UAddedDate</td>

                            <td>@item.UIsuserlogin</td>

                            <td>@item.UIsuseraproved</td>

                            <td>

                                <a asp-action="Details" class="btn btn-warning" asp-route-id="@item.UId">Details</a>


                            </td>

                            <td>

                                <a asp-action="Edit" class="btn btn-danger" asp-route-id="@item.UId">Edit</a>

                            </td>

                        </tr>

                    }

                </tbody>


            </table>


Conclusion:
There you go to edit records with Image .Thank you for reading ,Have a good day ! In the next article we will learn to add a drop-down from database value   in asp.net core.

Reference: